Whip Stitch on Felt: Joining Edges and Applique
Learn the whip stitch for felt: how to join two edges, turn corners, attach applique shapes and keep the stitches small, even and nearly invisible in matching thread.
Project kit
Materials
- Craft felt or wool-blend felt scraps
- Embroidery floss in a matching color
- Embroidery needle
- Small sharp scissors
- Pins or small clips
The whip stitch is the quickest way to hold two pieces of felt together by hand. The thread wraps over the edge in a row of short, even stitches, and because felt does not fray, there is no hem to turn under first. Worked small and in matching floss, the stitches sink into the surface and almost disappear, which is why this stitch turns up in keychains, pouches, applique and nearly every small stuffed shape.
It is also forgiving. Every stitch uses the same single motion, so a rhythm arrives within a few inches. If threading a needle and hiding a knot are still new, read the basics of hand sewing felt first, then come back to practice this one.
When to Use a Whip Stitch on Felt
The stitch does two different jobs. The first is joining: two layers are stacked and the thread wraps around both cut edges. The second is applique, where a small shape is stitched flat onto a larger background.
- Small joined shapes. Anything under about 2 in (5 cm) across, where a wider decorative stitch would look heavy.
- Tight curves and sharp points. Star tips, ears, leaf ends and the inside dip of a heart.
- Seams that should not show. Pouch sides, the base of a flower, the back of a brooch.
- Attaching flat pieces. Applique shapes, ribbon tabs and felt covers over hardware.
It beats the blanket stitch whenever speed, thread economy or an unobtrusive seam matter more than a decorative border. A blanket stitch frames an edge with a visible line; a whip stitch simply closes it. On thick or stuffed pieces it also pulls the two edges tightly together, so filling is less likely to peek through.
What You Need
- Two felt squares, 3 x 3 in (7.5 x 7.5 cm), for practice
- Embroidery floss, two strands, in a color that matches the felt
- An embroidery needle with an eye large enough for the floss
- Small sharp scissors
- Two or three pins or small clips
How to Whip Stitch Two Edges Together
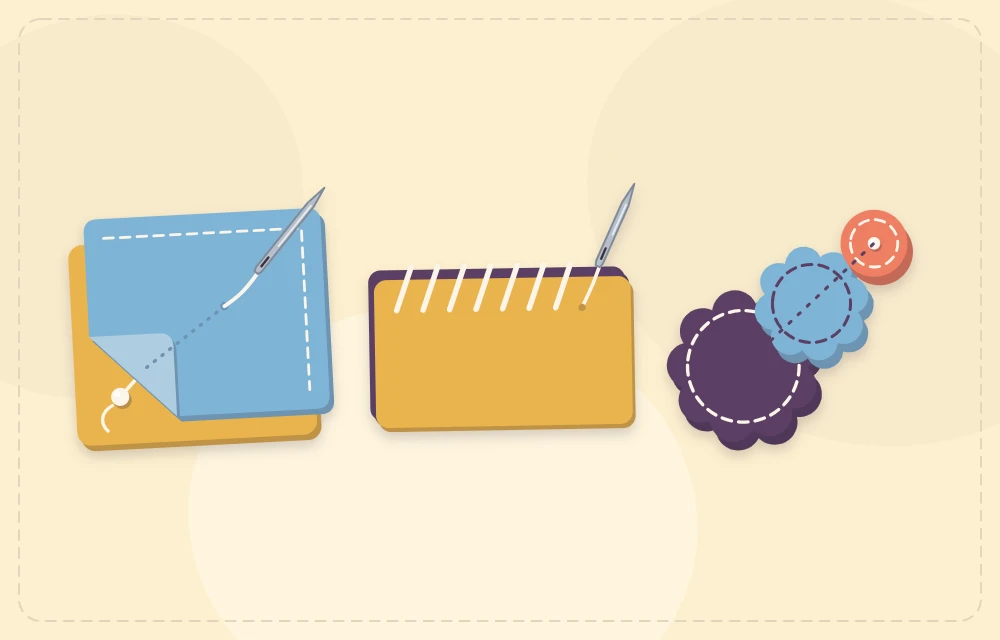
- Cut the thread. Use a length of about 18 in (45 cm). Separate two strands from the floss, thread the needle and knot one end.
- Stack and pin the layers. Line up the cut edges exactly. Any mismatch shows later as a ridge of the back color.
- Hide the knot. Open the layers slightly and push the needle through the front layer only, from the inside out, about 1/8 in (3 mm) from the edge. Pull until the knot rests between the layers.
- Make the first wrap. Carry the thread over the edge to the back. Push the needle through both layers from back to front, coming out a short step to the side of the first stitch.
- Pull snug, not tight. The thread should lie on the edge without denting it. Felt that puckers or scallops between stitches is being pulled too hard.
- Repeat in one direction. Always enter from the back and exit at the front. Keep each stitch the same depth from the edge and the same distance from its neighbor.
- End off inside the seam. After the last stitch, slip the needle between the layers, catch a few fibers of the back layer, pass the needle through the loop to form a small knot, then run the needle between the layers for 1 in (2.5 cm) and bring it out. Trim the tail flush so it springs back inside.
Angle, Depth and Spacing
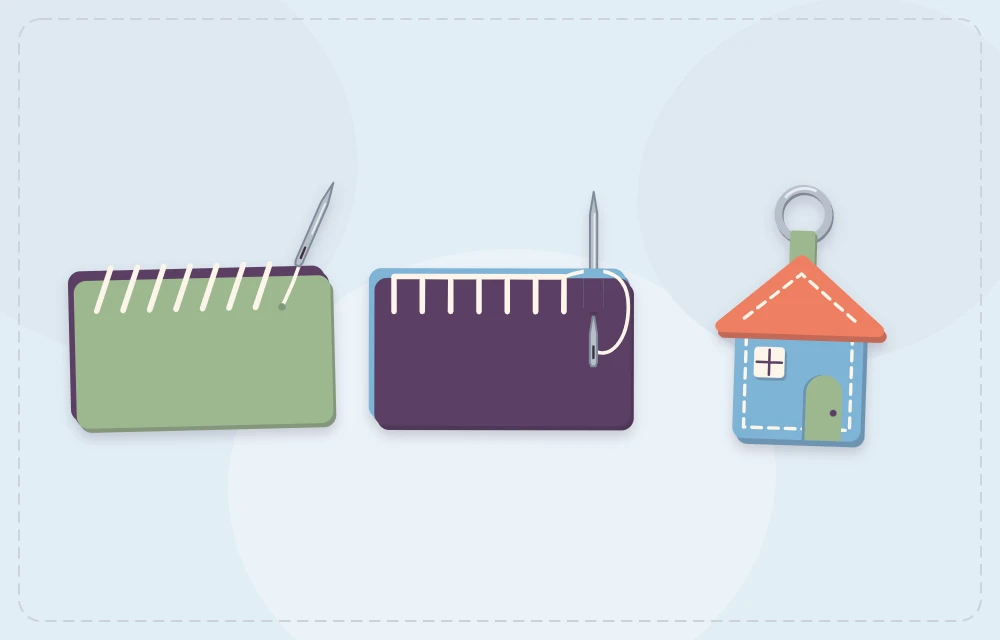
The angle of the needle decides how the stitch looks. Push the needle straight through, square to the felt, and the thread crossing the edge slants like a row of forward slashes. Tilt the needle so it enters the back a step ahead and exits the front directly opposite the previous stitch, and the visible stitches stand upright while the slant hides between the layers. Both are correct. Pick one and keep it for the whole seam.
| Piece | Depth from edge | Spacing |
|---|---|---|
| Tiny shapes and applique | 1/16 in (2 mm) | 1/8 in (3 mm) |
| Keychains, ornaments, pouch seams | 1/8 in (3 mm) | 1/8 in (3 mm) |
| Large or thick pieces | 3/16 in (5 mm) | 3/16 in (5 mm) |
For a seam that hides, match the floss to the felt in daylight. For a seam that decorates, use three strands in a contrast color.
Corners and points
At a square corner, shorten the last two stitches before the turn, place one stitch exactly on the corner so it sits on the diagonal, then continue along the next side. That diagonal stitch keeps the corner from gaping.
At a sharp point such as a star tip, there is very little felt to hold the thread. Take one stitch right at the tip and make it slightly deeper than the others. On an inside corner, such as the dip of a heart, work two stitches close together into the lowest point, because that spot takes the most strain when a shape is stuffed. A small split-ring project such as felt keychains is good practice for all three situations.
Whip Stitch for Applique
For applique the thread no longer wraps a pair of edges. Bring the needle up through the background and the small shape together, about 1/16 in (2 mm) inside the shape’s edge. Take it straight down into the background just outside the edge, directly beside where it came up. Each visible stitch is a tiny bar that sits square to the edge; the travel between stitches happens on the back.
Hold the shape with a pin or a very small dot of tacky glue in its center, well away from where the needle will pass. Stitching through dried glue is hard work and can bend a fine needle.
Common Problems and Fixes
- Stitches lean in different directions. The needle angle is changing. Slow down and check where the needle enters the back layer, not only where it exits.
- The edge ripples. Tension is too high. Unpick the last few stitches with the eye end of the needle and pull each one only until the thread touches the felt.
- The back layer shows as a ridge. The layers shifted. Add more pins, or trim both layers together after pinning and before stitching.
- Stitches look uneven in size. Mark light dots with a fabric pen on the back layer, or use the width of the needle as a spacing guide.
A Ten-Minute Practice Square
Stack the two 3 in (7.5 cm) squares and pin them. Stitch the first side with slanted stitches and the second with upright ones, turning the corner with a diagonal stitch each time. On the third side, shrink the stitches as small as possible in matching thread. On the fourth, switch to a contrast color and widen them. Keep the square as a reference for choosing a hidden or a decorative seam.
Frequently asked questions
How many strands of floss should a whip stitch use on felt?
Two strands suit most small felt projects. Use one strand for a nearly invisible seam on thin craft felt and three strands when the stitches are meant to show.
Is a whip stitch strong enough for stuffed felt shapes?
Yes, when the stitches are close together, about 1/8 in (3 mm) apart, and the thread is ended with a knot inside the seam. Add an extra stitch at inside corners, where the strain is highest.
Should whip stitches be slanted or straight?
Either is correct. A needle pushed straight through gives slanted stitches, and a tilted needle gives upright ones. The seam looks neat as long as the same angle is kept from start to finish.
Can a whip stitch be used instead of a blanket stitch?
On almost any joined edge, yes. Whip stitch is faster and less visible, while blanket stitch adds a decorative line along the edge, so the choice is mostly about appearance.